Thursday, February 24, 2022

LO5: Evidence of editing and How it Meets Codes and Conventions

 LO5: Evidence of editing and How it Meets Codes and Conventions


Visual edit:

For all of the scenes shown below I used the cutting tool to arrange and trim shots together. I then used the 'move' tool to arrange and align all of the clips into and around the timeline. I only used Adobe Premier to make this short film. While I did consider using Adobe After Effects for certain scenes I later decided I could create all effects inside of Premier and using After Effects would have been un-necesary and would over complicate the project with little benefit in return. 

All of the shots in this film were filmed in Sony's Slog-3. I then used Adobe's Lumetri colour to colour grade all of the shots. Slog-3 gives a very de-saturated and washed out look however when colour graded it gives a better dynamic range and actually creates more vibrant colours, if that is what you want when colour grading. I opted for slightly more de-saturated look on my film anyway often using a blue tint with a teal and orange overlay. This in turn creates a very 'grunge' and 'raw' looking product which helped compliment the themes shown in the film.

This colour style creates a very social realism looking aesthetic which helps connote to the audience that the film will be gritty and somber before having seen any action on screen. This colour choice is the opposite of using a high saturated colour tone with an orange tint which could connote happiness and a light hearted film.

Here is a direct comparison of raw Slog-3 footage compared to colour graded Slog-3 footage and I will break down my colour correction choices as well.


Raw Slog-3 Footage:


Colour Graded S-log3 footage:


As you can see the shot now has more contrast and saturation with more vibrant colours and a clearer depth of field. 


Initially I bring the exposure down slightly. Slog-3 performs it's best when it is filmed over exposed as it can capture a better dynamic range. You then bring the exposure down in post-production and get a clean image. This also stop noise being created on the image as when you increase the exposure noise begins to become noticeable. On this particular shot however I didn't quite expose the shot properly and the exposure did not need to be brought down too much. I also brought the contrast down a little bit. With the use of the RGB curves I found the contrast ended up being a little bit too high so I decided to decrease it a bit to make the image look nicer. I also gave the image a colder temperature (a blue tint). This gives the shot more of a 'raw' look. I then brought the highlights up a little bit. This was because as I explained earlier I didn't expose the scene properly and needed to raise the highlights a little bit so that actors was more visible. I brought the shadows and blacks down to increase contrast and remove the washed out look. I then increase the saturation a little bit to make his clothes have more colour and stand out more while also keeping the scene fairly de-saturated. 


The RGB curves are where I chose to create most of my contrast in the image. By bringing the lows and midtones down you create a deeper and more natural looking contrast in the image the compared to just moving the contrast slider up. I then brought the highlights up a little bit to keep the shot bright enough. 


I find the colour wheels are an optional extra when colour grading and can sometimes make the product look worse if it hasn't been shot correctly. I opted for a teal and orange colour overlay making slight adjustments to each wheel to create a subtle colour grade over the top.


I repeated this for each shot throughout the film however, any shots that were in the same location and shared similar lighting, I found I could copy and paste the colour grading preset across and get a good result. Each scene however varied in lighting and therefore required slightly different colour grades to get the best result. 


Scene 1/2:

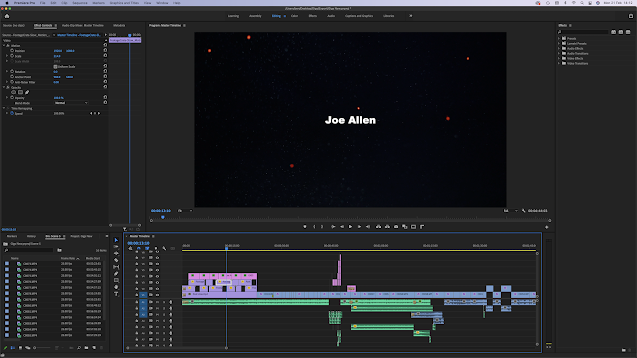
First I added intro titles with everyone involved name's being shown. The music in the background is from a Sheffield based rapper known as 'Deep Green'. This song ties well into the themes of the film e.g. selling drugs, killing people etc. This also ties into the location of the film as it is set in Sheffield and it makes sense to have a Sheffield based rapper playing on the introduction and the opening scene. While this is a subtle touch people who know the rapper will appreciate it. 


I also added different fire spitting and dust effects into the background. This adds depth and another visual aspect into the title sequence making it more interesting and appealing to watch. The dust layers also add more depth and while not being immediately noticeable it benefits the scene and creates depth. 


The titles also have keyframes making them get bigger while they are on screen. This then adds another visual element and makes in more entertaining to watch.


All of the cuts on screen are in time with the beat therefore creating a more visually appealing product.


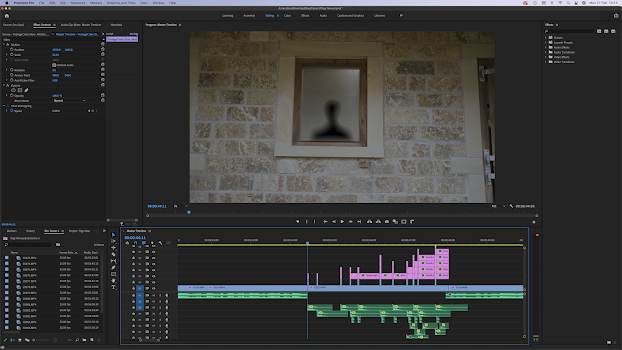
This shot uses a silhouette in a window to connote people being shot. The light behind the silhouette flashes on for 1 frame (the true length of a muzzle flash) when a gunshot occurs and remains dark when no guns are being fired. The silhouette then appears when the light is cast. 


Here is an example of the window without the muzzle flash light being cast.


Different silhouettes are also shown during the brief shootout. This denotes that there is more than one person being shot or doing the shooting (that part is open the audiences interpretation). 


After someone has been shot at the window a blood splatter appears. While the light is on it has more saturation than when the light isn't on. This is because the light will allow the blood to be seen easier and will cast more lights onto the colour of it.


Here is an example of the blood splatter without the muzzle flash light in the background. The saturation is lower giving it less colour and contrast as well as being harder to see. 


Both the silhouettes and the blood splatters have a gaussian blur added to make them appear fuzzy and give the idea that they are being the window when in actual fact they were overlaid over the window in post production.


The silhouettes then get bigger and connote to the audience that someone is running to the window. The blood splatters increase and are overlaid to show more blood on the window to connote the same person is being shot multiple times.


(Sound)

I also layered up multiple sound effects such as gunshots, bullets hitting people, glass breaking and bullets dropping. It is highly unlikely someone will notice all of these individual sounds however together they make the whole shot sound more realistic and create verisimilitude.

Originally this scene was meant to have far more actors and more detail. We were supposed to show dialogue between characters and special effects would have been used to show people being shot and people shooting guns. However, due to complications with availability and actors pulling out mid filming this is the scene I opted to film instead on the morning of the shoot. 


Scene 3:


I added a dip to black transition from the last scene to this one. This allows for a smooth transition and helps the audience know they are watching a new scene.


I added a dip to black at the end of this scene so it can transition smoothly onto the next scene. The audio also fades out in order to allow for the new scene to begin. 


Scene 4:


Here I have used another constant gain transition to smooth the cuts between dialogue and make them sound more natural and as if they were done in one take. 


I then added a dip to black transition at the end which causes this scene to fade out and has the next scene cut straight in (as opposed to having this scene fade out and the next fade in). This is because I wanted a smooth transition between scenes but I also wanted the scenes to remain 'fast' to build audience tensions and I typically find fading in to a scene causes it to naturally move at a slower pace. 


Scene 5:


Here I added an impact sound effect and a straight cut to black. This implies the character has been knocked out and will help transition to the next scene smoothly. This will also allow the next scene to be possible as the character is scene tied up. It can be connoted all of this occurred while he was unconscious and makes the idea behind the next scene more plausible. 


Scene 6:


The final scene begins with a fade in from black. This connotes that the audience are being brought into the scene at the same time the character is waking up from being knocked out. Music also fades in, this allows for a brief montage of shots of the character regaining his consciousness and allows the audience to see him being tied to a chair and the antagonist 'waving' a gun around creating suspense for the audience. 


Audio Edit:

For this film's audio production I used Adobe Premier to edit and adjust all music and sound effects. I got all of my sound effects from Epidemic Sounds which I have a subscription for and licensing to use. The only audio asset that I didn't have licensing for was the song used in the introduction 'Nightrider - By Deep Green'. If this project was to be released I would either have to agree with the artist or the management company to get the correct permissions to use the song or I would have to remove it and find another song to which I had the correct permissions to use. 


In order to correctly balance dialogue and keep the audio the same throughout the film I used the same equipment each time I filmed and edited e.g. Camera, microphone and editing software. This then made it much easier in post production as all the audio clips were recorded at the same volume. I could then adjust the gain on sound effects the make them fit into the scene and work around the audio we already had. I avoided raising the gain on any of the dialogue clips and I didn't want to create any unwanted distortion. 


Scene 3:


(Sound)

I then added a parametric equaliser to the music in this scene. With this I was able to bring town the high frequencies. This then gives the impression the person is listening to the music in the car while the camera is outside. In reality there was no music on and the windows were down to give a clear shot of the actor.


(Sound)

I then also added multiple other sound effects into the scene such as: Birds humming, tyres rolling on gravel, ignition keys being turned off, engines starting and doors opening. Once again all of these sounds mayn't be noticed but they will help the make the product as realistic as possible. 


(Sound)

I also added a 'Constant Gain' to certain audio tracks. This creates a smooth transition in dialogue. I used this transition when the environment conditions change during cuts between dialogue e.g. there is wind in one shot and not in the other. This helps smooth the two audio tracks over and doesn't create and unwanted obvious cut noises.


Here I added another constant gain transition to help smooth the cut in dialogue between shots and make it less noticeable. 


Here I used the parametric equaliser again to bring down to high tones of this car driving off. I got this sound effect from epidemic sounds (which I have a subscription for meaning I can use the royalty free sound effects and music they have). Bringing down the highs it makes the car sound further away. I then keyframed the volume to gradually decrease giving the impression a car in the background has driven off. 


Scene 4:


Here I used stock sounds to imitate the sound of a gun being cocked and moved around. The layered sound provides a more realistic representation and when timed with the visuals correctly it creates a seamless visual and sound effect. I also overlaid dialogue on top of this layer because I had to remove the original audio as I did not have the actors speaking when we filmed this close up (so the gun could be seen clearly by the audience). This is how I planned the shot and in turn it keeps the actors dialogue flowing while adding another element of intrigue for the audience as they will be wondering what they will use the gun for next. 


Scene 5:


Here I added a gun sound effect to help aid the visuals of a gun being pulled out. It makes the scene sound more natural and in turn makes the scene look more believable to the audience. 


Here I added an impact sound effect and a straight cut to black. This implies the character has been knocked out and will help transition to the next scene smoothly. This will also allow the next scene to be possible as the character is scene tied up. It can be connoted all of this occurred while he was unconscious and makes the idea behind the next scene more plausible. 


Scene 6:


The final scene begins with a fade in from black. This connotes that the audience are being brought into the scene at the same time the character is waking up from being knocked out. Music also fades in, this allows for a brief montage of shots of the character regaining his consciousness and allows the audience to see him being tied to a chair and the antagonist 'waving' a gun around creating suspense for the audience. 


Here I added sound effects when the gun was being loaded and cocked. I then used a parametric equaliser to bring down the high tones to make it sound further away. After doing this I still didn't feel like it felt 'real enough' so I added a studio reverb effect to make the gun sound further away which in turn gave the shot a more believable sound. 


Here I added a fade to the song in the background so it would gradually get quieter. This then transitioned smoothly into the dialogue section of the scene. 


Finally I made the finishing touches to this scene and added a few constant gains to create smooth audio transitions. At the end I also added a dip to black for the credits to then begin rolling.


Overall the post production of the project helped improve the narrative and visual aspects of the short film. There were elements that would physically not be possible without the help of visual effects such as: Blood splatters, gunshots, fights breaking out and even creating a dramatic look in the film. Colour grading helped me a lot in getting style of shot I was intending. By filming in Slog-3 I had the option to darken any scenes that I felt appropriate to help further the narrative. For example the final scene was darker than all other scenes to help the connotations that something bad was about to happen. Adobe Premier also allowed me to edit different shots together seamlessly to create a refined overall scene. I could then integrate all of these scenes together in a master timeline, add transitions and then create a finished product.

The themes shown throughout the film are reinforced in several ways through subconscious connotations that the audience would expect to see due to the conventions of the genre. The costume choice throughout is very stereotypical 'gangster' e.g. Tracksuits, puffer coats, gold jewelry etc. These costume choices will then help connote the themes and representations shown in the film and further the narrative.

The locations denoted in the short film also help further the themes of the film. The main locations shown are inside of the protagonist's car, an industrial unit and a shed in an undisclosed location. These locations are all common locations used in 'gangster films'. The shots inside of cars connote that the meeting has occurred spontaneously and the actions carried out will also be spontaneous. If the meeting wasn't spontaneous they would have arranged to meet somewhere else allowing more time for both of them to get there. The use of an industrial unit is very stereotypical for a dug deal. They are secluded and are often used in shows such as Top Boy and Power for drug deals therefore furthering the themes of this short film and helping meet the conventions better.  


First draft of the film:

https://youtu.be/1V6lnaVCrFQ 


Finished Film:

https://youtu.be/9eIMrbc4778


Tuesday, February 22, 2022

LO4: Rushes (Before and After)

 LO4: Rushes (Before and After)


All Rushes (Before and After):

https://youtu.be/ylJ96vPlxAs


This link will take you to a montage of all the rushes I have chosen to use. It shows a clear before and after structure. This then shows you the raw footage with no editing such as: colour grading, sound editing, special effects and sound effects. By using this style you can see the shot before editing and can easily compare it to the edited version of it with colour, duration and sound differing between raw footage and edited footage.


Scene 3 'Expanding' Before and After:

Before:

https://youtu.be/xXVkaKnq5xA


After:

https://youtu.be/KvO7HOi4eVc


For this, I shot the raw footage in Sony's S-log 3. While it looks washed out and desaturated on it's own, once it has been colour corrected in Adobe Premier it will gain a larger dynamic range creating a more professional and cinematic look. The edited version also uses a few extra camera angles when compared to the raw footage. This allows for the audience to see the dialogue between the two easier and subconsciously helps them focus on who is talking. This is due to who the shot is focused on through the aperture of the shot and by the composition of where people are stood (the person talking up the most space in the shot is most likely who the audience will focus on). The colour correction added to the S-log footage adds more colour and saturation while also bringing down the highlights to reduce the overexposure (done purposely to get the best S-log 3 results) and bringing up the shadows to create a higher contrast. I overexposed the S-log footage because that colour mode performs its best when it has more light when compared to less. By bringing down the exposure it keeps the quality of the image and creates the colour grade I am wanting. However, if I was to underexpose or even 'expose perfectly' there still wouldn't be enough light and the shots would look too dark. If I was to then raise the exposure it would create noise in the image and cause it to lose it's quality. My camera settings for this shot were a shutter speed of 50 (double my frame rate of 25fps). An aperture of 4.0 to make sure both actors are in focus when they appear in shots together. An ISO of 800 with an ND filter on the lens to keep all my camera setting the same.

This shot meets conventions of a 'gangsta film' with the use of costumes. Both of the actors in the shot are both wearing brands associated with 'violence' and 'drug dealers' for example: Stone island and Berghaus. These clothes then further the connotations of drugs and violence and help it meet the conventions surrounding the genre.


Raw footage:


https://youtu.be/eLbRODekjUg


Edited:


https://youtu.be/5o3Mx1d2GW0


These two videos show the noise created by underexposing S-log footage and is evidence why overexposing slightly will give you better results.

The overcast weather creates a moody lighting. This lighting then makes the inside of he car look dark inside and helps to create a cinematic lighting look while the protagonist is deep in thought.


Scene 3: 'Fight' Before and After:


Before:


https://youtu.be/7aaMgfyU1W4


After:


https://youtu.be/x5gjqABMicw


For this shot, just like the one before, I filmed it in S-log 3 meaning while the raw footage looks de-saturated and washed out once colour graded it will have more dynamic range and will look more cinematic. For the 'fight' scene I used the same overcast weather natural lighting. This then helped make the scene look authentic as an audience would expect soft natural lighting for something shot outside in overcast weather. My camera settings for this shot were a shutter speed of 50 (double my frame rate of 25fps). An aperture of 4.0 to make sure both actors are in focus when they appear in shots together. An ISO of 800 with an ND filter on the lens to keep all my camera setting the same.

This links to the conventions of the 'Gangsta Film' genre by having a stereotypical 'violence scene'. This scene creates intrigue and action for the audience and helps draw them in for the rest of the scene and film. It creates suspense and helps keep the audience on their toes wondering what will happen next.


Scene 3: 'Joe Walking' Before and After:


Before:


https://youtu.be/TiYA6JSQ8kA


After:


https://youtu.be/QxasisK5pX0


My camera settings for this shot were a shutter speed of 50 (double my frame rate of 25fps). An aperture of 4.0 to make sure both actors are in focus when they appear in shots together. An ISO of 800 with an ND filter on the lens to keep all my camera setting the same. The S-log footage was also colour graded to create contrast and to remove the original washed out look. One again the overcast weather for this shot remained the same to give the shot a realistic look.

This shot meets conventions of the genre by the use of colour and weather. The colour correction used in this shot gives it a dark look and helps emphasize the emotion on the actors face. This then creates a moody cinematic appearance. This then links to the conventions of the genre as it helps link to the dark themes connoted throughout.


Scene 4: 'Intro' Before and After:


Before:


https://youtu.be/NqE6YHosHJs


After:


https://youtu.be/-g7ejbFSBCM


These shots once again use natural lighting however, the sun acts as a key light on the actors which inadvertently draws the audiences attention to the actor with the most light on them while casting shadows onto the other actor. Once again the S-log footage was colour graded to add contrast to the original shots. Due to the lighting however, this was the hardest shot to colour grade as the harsh key light on the actors make it difficult to properly expose and add colour without the shot looking 'off'. My camera settings for this shot were a shutter speed of 50 (double my frame rate of 25fps). An aperture of 4.0 to make sure both actors are in focus when they appear in shots together. An ISO of 800 with an ND filter on the lens to keep all my camera setting the same.

This shot meets the conventions of a 'gangsta film' with the use of the location. In many other 'gangsta films' such as 'Power' and 'Top Boy' people will discuss their plans in a car. By using this location it connotes a spontaneous decision is being made and that the people discussing the plans haven't had much time to process them and aren't going to spend too long planning, they want to eliminate the problem as soon as possible.


Scene 4: 'Argue' Before and After:


Before:


https://youtu.be/7Dp0gNErieU


After:


https://youtu.be/_w5spFU8T_I


This scene was ver similar to film as the previous one. The natural light also acts a key light on the actors drawing focus to who has the most light shining on them. Once again this shot was harder to colour grade than the other scenes due to the harsh light. My camera settings for this shot were a shutter speed of 50 (double my frame rate of 25fps). An aperture of 4.0 to make sure both actors are in focus when they appear in shots together. An ISO of 800 with an ND filter on the lens to keep all my camera setting the same.


This shot meets conventions of a 'gangsta film' by the use of costume. The character in the passenger seat is wearing a Burberry puffer jacket which is synonymous around Sheffield due to the amount of times Burberry has been mentioned by Sheffield rapper 'Deep Green'. The rapper is often seen wearing Burberry items such as puffer coats and often raps about them in his songs. This then links to costume choice to the Sheffield rap scene and possible crime underworld. The character in the passenger seat is also seen to be wearing a big gold chain. This once again is a stereotypical item for drug dealers and helps connote the occupation of the characters through clothing choices.


LO3: Risk Assessment

 LO3: Risk Assessment 


Thursday, December 2, 2021

LO3: Annotated Script With Camera Angles and Directions

Scene 1:

Scene 1 will mainly consist of visuals and music and will not rely heavily on dialogue. There will however be brief scenes of dialogue to give the audience context as to what is happening.


Scene 1 will use a key light to create dramatic lighting by only lighting certain parts of the actors therefore leaving shadows and dark areas on screen.


Fade From Black:

Title Sequence over footage of people in a room 'getting ready' and dark streets of Sheffield.

(This scenery will then connote mystery and intrigue surrounding the people and what they are doing in these places at night - therefore connoting something possibly illegal due to the stereotypes surrounding shady activity going on at night).

Music will be playing in the background. 


Song: Peligro by Giggs and Dave.


Song starts from beginning and the title scene lasts for 33 seconds

until the vocals begin.


Once the title scene is over the sequence montage of people in a room will continue and will cross cut to shots of the streets with someone stood under a light exchanging 'goods' with passers by. 


No words will be spoken for the entirety of the scene, it will be completely made up of visuals.


Scene 2:

This scene will use the natural lighting outside as well as the lighting in the shed to create realistic and 'normal' looking light.


This scene properly begins when the main group break through the door into the shed. The same song will be playing during the transition of scenes and will stop when they break into the rivals groups 'hideout'.

A fight then breaks out.

Someone is shot and the leader of the rival group is beaten and dragged to the middle of the room.

Lighting will be dark to help create a moodier look which will compliment the theme of the scene which will consist quite heavily of violence. 


Camerawork:

Adz:

Get on your fucking knees, now.


Medium Close up of Rival Leader. 


Rival Leader:

Your making a big mistake you fucking idiot.


Medium Close up of Adz.


Adz:

Yeah Yeah, shut up, I told you to get on your knees not speak.


Wide shot of Charlie and Tom pushing Rival Leader onto his knees.


Rival leader is pushed down onto his knees.


Close up of Rival Leader.

Rival Leader:

Do you know who I work for? Harrison's gunna come for you and he'll murder all of you pussies.


Medium Close up of Adz.

Adz:

Well that's unlucky for you, I don't see Harrison here right now, Do you?

Looks at Charlie


Cut to medium close up of Charlie.


Charlie:

All I see is a little bitch.


Medium close up of Rival leader, mid way through his sentence it will cut to a medium shot of Adz.


Rival Leader:

You've fucked up big time.


Adz:

It's nothing personal g, just business.


Cut to low angle POV shot of Adz. 


Raises gun to Rival Leaders head.


Cut to high angle  medium close up of Rival Leader.


Rival Leader:

Wait Wait Wait, just think about it, it doesn't have to be like this.


Cut to low angle POV shot of Adz.


Adz:

I think we both know it does...


Adz shoots rival leader in the head. The screen the cuts instantly to black.


Scene 3:

This scene will be shot using natural lighting. The weather will be overcast creating a moody lighting effect while still having all the actors evenly lit and exposed.

Fade in from black.

This scene will feature Charlie on his own getting his re-up from his supplier Gabe while Ads is laying low after the previous incidents. 

Charlie will be waiting in his car until Gabe shows up and they will exchange goods.

Gabe Arrives.

Charlie gets out of his car with Gabe doing the same.

Charlie gets a bag out of the boot and begins walking over to Gabe.

Gabe walks over quickly and punches Charlie, Charlie then drops to the ground.


Gabe:

You fucking idiot.


Charlie:

What the fuck g? Are you fucking daft?


Gabe:

Nah you listen to me Charlie, av heard about what you and fuckin Adz did the other day.


Charlie:

Yeh we were fucking expanding like you told us too you cunt.


Gabe:

I don't give a shit about you expanding but you forgot the first fucking rule that I taught you, never leave witnesses.


Charlie:

We fucking took them all out, there wasn't no witnesses.


Gabe:

You think you did but either you or Adz must have a shit aim because one of them was still breathing when you left and guess who the first person he told was.


Charlie:

Fuck... Harrison knows it was us?


Gabe:

Your damn right he does and you best believe he'll be coming for you. I thought I taught you better than this. If your gunna expand you've got to go balls deep on that bitch, there can never be a fucking witness. 


Charlie:

Ayt then we'll sort it out.


Gabe:

Clearly you aren't fucking smart enough to sort this shit out if you couldn't even handle a simple fucking expansion. Harrison is a serious motherfucker and he's gunna be looking for you. Lay low and stay out of sight while I find a way to get you too out of this mess.


Charlie:

We can handle this hones...


Gabe:

Shut the fuck up, I thought you were smarter than this but clearly I was wrong. You're not doing shit until I say so. Now give me this money and fuck off.


Gabe grabs the bag from Charlie and drops two duffel bags on the floor.

They both get in their cars and drive off.


Scene 4:


This scene will be shot with natural lighting with overcast weather as well to create continuity between this scene and the prior scene.


Charlie is sat in his car waiting for Adz to meet him.

Adz then gets in the car.


This scene will alternate between medium close up shots through the windows of the car.


Medium Close up of Adz


Adz:

Mate what the fuck was so important... What the fuck hastened to your eye?


Charlie:

Mate forget that, Harrison knows about what we did.


Medium Close up of Adz


Adz:

Shittttt... how?


Medium Close up of Charlie


Charlie:

Apparently one of em survived and they've fuckin told him.


Medium Close up of Adz


Adz:

Ayt well we can handle him, just find him and take him out?


Medium Close up of Charlie


Charlie:

Yeh I suggested that to Gabe, how do you think my eye got like this?


Medium Close up of Adz


Adz:

He did that to you? Bro lets go get him, fuck Harrison.


Medium Close up of Charlie


Charlie:

Nah fuck that right now, Harrisons gunna be coming after us so Gabe said lay low and wait for his word.


Medium Close up of Adz


Adz:

Mate fuck thatttt.


Medium Close up of Charlie


Charlie:

Init fuck that, we do need to be fuckin careful tho cos if I was him I'd be on demon time right now.


Medium Close up of Adz


Adz:

yeye, we'll drop all this shit off and then we'll work out what to do from there.


Medium Close up of Charlie


Charlie:

Sound lad.


They then drive off.


Scene 5:


This scene will be shot with street lights to be used as key lights to create atmospheric lighting on the subjects in the drk environment.


Fade in from black.

Adam and Charlie are walking down a dark street laughing having been out for the night.

The scene cross cuts between them walking and a car driving, it is implied it is towards them.

This cross curt montage will last for around 30-40 seconds.

The camera will then cut to Adam and Charlie. 

Car lights will appear behind them. 

4 people will then jump out of the car and will attack Charlie and Adam.

They will then put them in the back of the car and drive off. 


Scene 6:

This scene will use a key light off camera to cast shadows in the scene and create a moody and dramatic lighting style helping to further the narrative of the scene.


The scene will fade in from black with Adam and Charlie tied up in a dark room with blindfolds over their faces.

A man will be sat across from them (Harrison). 

The blindfolds will then be pulled off of their faces.

They will all look at each other for a brief second.


Mid shot of Harrison


Harrison:

I'll tell you what lads, you've got some balls I'll give you that. 


Cut to mid shot of Adz and Charlie


Adz and Charlie remain silent. 


Cut to another mid shot of Harrison


Harrison:

You took out my runners and then decided to keep the territory for yourself. You know you fucked up right?


Charlie:

Your boys weren't meeting the demand so we decided to expand a little. It's nothing personal g. 


Harrison:

You know what I understand that, I hope you'll feel the same about this.


Harrison pulls out a gun and aims it at Charlies head.

Charlie stairs down the barrel of the gun.

Harrison fires the gun however it isn't loaded. 


Harrison:

Here's what's gunna happen. You took out 4 of my guys. They were bringing in about 10 grand each a month so your gunna pay me 40 grand month... or you die. Also your supplier... Gabe? He's got to go. He's been fucking me off for years and honestly I'm bored of him now. I'll let you keep the territory you stole from me cos lets face it your not gunna make anywhere near what you owe me without it. You fail to do either of these things... I'll kill both of you myself. I'll give you a week to kill Gabe and I want proof when you bring me my cash.


Charlie and Adz remain silent.


Harrison:

Right get them the fuck out of here.


Males come in and drag Charlie and Adz out.


Shouting

Harrison:

Don't forget my fuckin money!


They are then thrown onto the street.


Blue Lights - Jorja Smith.

Music Fades in.

Masked men appear and blindfold the two of them. They drag them out.

A brief montage occurs with music still playing in the background with the two being thrown onto the street both looking distressed.

The scene fades to black.

Titles then begin playing. 

LO5: Influences for my Shots

 LO5: Influences for my Shots Power: Top Boy: Both of these TV series' have a social realism style, one set in London and the other set ...